



Share
Introduction
Ham and cheese tortilla roll-ups are one of the easiest cold snacks you can prepare when you want something quick, fresh, and satisfying. These soft tortilla pinwheels are filled with creamy cheese spread, cooked ham, cheddar, crisp lettuce, and thin tomato slices. As a result, every bite is creamy, savory, slightly crunchy, and full of simple homemade flavor.
This recipe is perfect for lunchboxes, picnics, parties, buffets, school snacks, office lunches, or relaxed family meals. Since the roll-ups are served chilled, they are especially practical when you need a make-ahead recipe that does not require reheating. Moreover, they are easy to slice, easy to serve, and easy to customize.
Another reason these tortilla roll-ups are so useful is that they require only a few everyday ingredients. Flour tortillas create a soft wrap, cream cheese holds everything together, mustard adds a light tang, cheddar brings richness, and ham gives the roll-ups their classic savory flavor. Then, lettuce and tomatoes add freshness and color.
Although they look simple, the key to perfect tortilla roll-ups is moisture control. The lettuce should be washed and dried well, and the tomatoes should be patted dry before adding them. This prevents the tortillas from becoming soggy and helps the pinwheels keep their shape.
If you need a quick cold recipe that works for both adults and children, these ham and cheese tortilla roll-ups are a reliable choice. They are creamy, fresh, portable, and ready with very little effort.
History and Information About Tortilla Roll-Ups
Tortilla roll-ups, also known as tortilla pinwheels, became popular because they are practical, versatile, and visually appealing. Instead of serving a regular sandwich, the ingredients are layered inside a tortilla, rolled tightly, chilled, and sliced into small rounds. This creates a neat spiral shape that looks attractive on lunch plates and party trays.
The idea is similar to wraps, but the presentation is different. Wraps are usually served whole, while roll-ups are sliced into bite-sized pieces. Because of this, they are especially convenient for gatherings, appetizers, and lunchboxes. They are easy to pick up, easy to portion, and simple to eat without utensils.
Ham and cheese is one of the most classic combinations for tortilla roll-ups. Cooked ham brings a mild salty flavor, while cheddar adds creaminess and richness. Cream cheese works as a spread and a binder, helping the layers stick together. Without a creamy spread, the roll-ups may open or fall apart when sliced.
The addition of Dijon mustard gives the filling more depth. It cuts through the richness of the cheese and pairs beautifully with ham. Mayonnaise makes the spread smoother, while black pepper adds a little warmth. Fresh chives or parsley can be added for a brighter flavor, although they are optional.
Lettuce and tomatoes make the roll-ups feel fresher and more balanced. However, they must be handled carefully because they contain moisture. Dry lettuce helps keep the tortilla firm, and firm tomatoes are better than very juicy ones. Patting tomato slices dry before assembling is one of the best ways to keep the roll-ups clean and easy to slice.
This recipe is also easy to adapt. You can use turkey instead of ham, mozzarella instead of cheddar, whole wheat tortillas instead of white flour tortillas, or add cucumber, roasted peppers, pickles, or avocado.
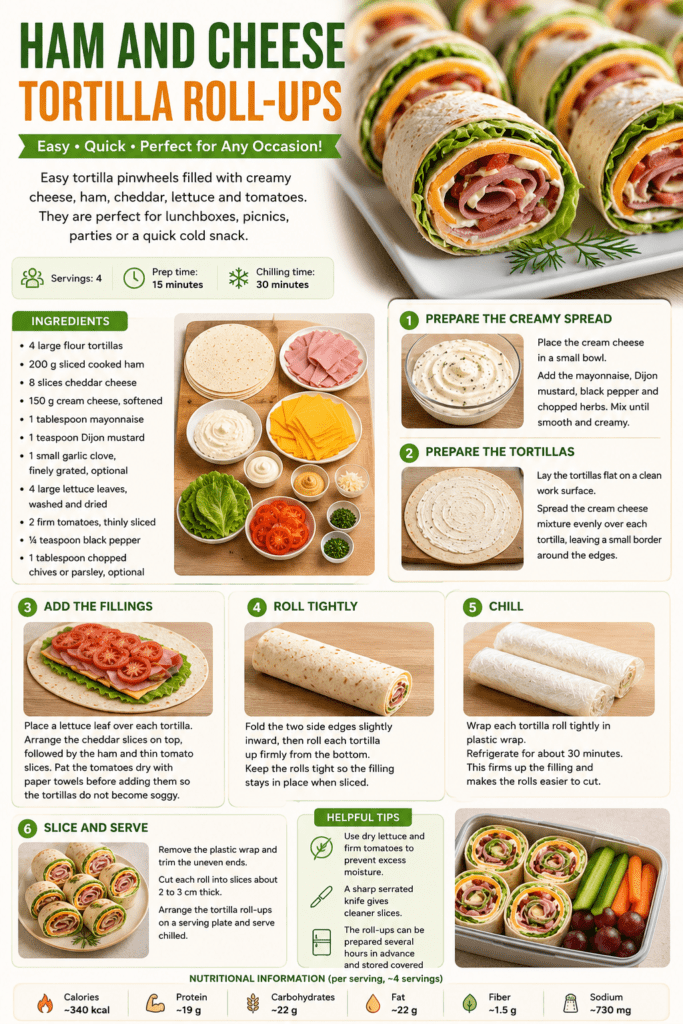
Ingredients
- 4 large flour tortillas
- 200 g sliced cooked ham
- 8 slices cheddar cheese
- 150 g cream cheese, softened
- 1 tablespoon mayonnaise
- 1 teaspoon Dijon mustard
- & 1 small garlic clove, finely grated, optional
- 4 large lettuce leaves, washed and dried
- 2 firm tomatoes, thinly sliced
- 1/4 teaspoon black pepper
- 1 tablespoon chopped chives or parsley, optional
Preparation Step by Step
Step 1: Prepare the Cream Cheese Spread
First, place the softened cream cheese in a small bowl. Add the mayonnaise, Dijon mustard, black pepper, and chopped chives or parsley if using.
Mix everything together until the spread becomes smooth and creamy. The cream cheese should be soft enough to spread easily over the tortillas. If it is too cold, let it sit at room temperature for a few minutes before mixing.
This creamy spread is important because it adds flavor and helps hold the roll-ups together. The mustard adds a light tang, while the mayonnaise makes the texture smoother.
Step 2: Add Garlic for Extra Flavor
If you want a stronger savory taste, add the finely grated garlic clove to the cream cheese mixture. Mix well so the garlic is evenly distributed.
Garlic is optional, but it gives the roll-ups a more flavorful and homemade taste. Since raw garlic can be strong, use only a small clove and grate it very finely.
If you are making these roll-ups for children or a very mild lunchbox version, you can skip the garlic completely.
Step 3: Prepare the Tortillas
Lay the flour tortillas flat on a clean work surface. Make sure they are soft and flexible before spreading the filling.
If your tortillas feel a little stiff, warm them very briefly in a dry pan or microwave for a few seconds. This makes them easier to roll without cracking. However, let them cool before adding lettuce and cheese so the filling stays fresh.
Working with one tortilla at a time makes assembly easier and keeps the ingredients organized.
Step 4: Spread the Creamy Mixture
Spread the cream cheese mixture evenly over each tortilla. Leave a small border around the edges so the filling does not squeeze out when rolled.
Use the back of a spoon or a small spatula to create an even layer. Try not to make the spread too thick in the center, because that can make the roll-ups bulky and harder to slice.
The cream cheese layer also acts like a barrier between the tortilla and the vegetables, helping reduce sogginess.
Step 5: Add the Lettuce
Place one large lettuce leaf over each tortilla. Before adding it, make sure the lettuce is completely dry.
This step is important because wet lettuce can make the tortilla soft and soggy. After washing, dry the leaves with a clean towel or salad spinner.
The lettuce adds freshness, color, and a light crunch. It also helps separate the cheese spread from the tomato slices.
Step 6: Add the Cheddar Cheese and Ham
Arrange the cheddar slices on top of the lettuce. Then, add the sliced cooked ham over the cheese.
Try to cover the tortilla evenly, but avoid piling the ham too thickly in one area. Even layers make the roll-ups easier to roll and slice.
Cheddar gives the roll-ups a rich flavor, while ham adds the classic savory taste. Together, they create a simple and satisfying filling that works well for both snacks and lunches.
Step 7: Add the Tomatoes Carefully
Thinly slice the firm tomatoes, then pat the slices dry with paper towels before placing them on the tortilla.
This step is essential for keeping the roll-ups fresh and firm. Tomatoes contain a lot of juice, and too much moisture can soften the tortilla quickly.
Arrange the tomato slices in a thin layer. Avoid using too many, because the rolls need to stay tight and easy to cut.
Step 8: Roll the Tortillas Tightly
Fold the two side edges slightly inward. Then, roll each tortilla up firmly from the bottom.
Keep the roll tight as you go so the filling stays in place. However, do not press so hard that the tomatoes release liquid or the tortilla tears.
A tight roll creates cleaner pinwheels and prevents gaps in the slices. Once rolled, place the seam side down.
Step 9: Chill the Roll-Ups
Wrap each tortilla roll tightly in plastic wrap. Then, refrigerate the rolls for about 30 minutes.
Chilling helps the cream cheese firm up and holds the layers together. As a result, the roll-ups are much easier to slice cleanly.
You can also prepare them several hours in advance and keep them covered in the refrigerator until serving.
Step 10: Slice into Pinwheels
Remove the plastic wrap and place the chilled tortilla rolls on a cutting board. Trim the uneven ends if desired.
Using a sharp serrated knife, cut each roll into slices about 2 to 3 cm thick. A serrated knife works well because it cuts through the tortilla and filling without pressing everything flat.
Wipe the knife between cuts if needed for cleaner slices.
Step 11: Arrange and Serve
Arrange the ham and cheese tortilla roll-ups on a serving plate. Serve them chilled for the best texture.
These pinwheels are perfect as a snack, lunchbox item, party appetizer, picnic food, or quick cold meal. You can serve them on their own or with a simple salad, vegetable sticks, fruit, pickles, or a small bowl of extra dipping sauce.
For a party platter, arrange them in circles or rows so the colorful filling is visible.
Nutritional Information
The following nutritional values are approximate and may vary depending on the size of the tortillas, type of ham, cheese, cream cheese, and mayonnaise used. This estimate is based on 4 servings.
Each serving of ham and cheese tortilla roll-ups contains approximately 430 to 550 calories. It provides around 22 to 30 g of protein, 35 to 45 g of carbohydrates, and 22 to 32 g of fat.
The ham and cheddar provide most of the protein and savory flavor. The tortillas add carbohydrates and make the roll-ups filling. Cream cheese and mayonnaise contribute creaminess and richness, while lettuce and tomatoes add freshness, color, and a small amount of fiber.
To make the recipe lighter, you can use light cream cheese, reduced-fat cheddar, lean ham, and whole wheat tortillas. You can also use Greek yogurt instead of mayonnaise in the spread. To make it more filling, serve the roll-ups with boiled eggs, fruit, or raw vegetables.
Overall, these tortilla roll-ups are a practical and satisfying cold meal or snack that can be adjusted to suit different tastes and needs.
FAQ
Can I Make Ham and Cheese Tortilla Roll-Ups Ahead of Time?
Yes, these roll-ups can be made several hours in advance. Wrap them tightly in plastic wrap and keep them in the refrigerator until ready to slice and serve. For the best texture, add tomatoes that have been patted very dry.
How Do I Keep Tortilla Roll-Ups from Getting Soggy?
Use dry lettuce and firm tomatoes, and always pat the tomato slices with paper towels before adding them. Also, spread the cream cheese mixture evenly over the tortilla, as it helps create a barrier against moisture.
Can I Use Whole Wheat Tortillas?
Yes, whole wheat tortillas work very well. They add extra fiber and a slightly nuttier flavor. Make sure they are soft and flexible before rolling so they do not crack.
Can I Replace Ham with Turkey or Chicken?
Yes, sliced turkey, chicken, roast beef, or smoked turkey can be used instead of ham. Choose thin slices so the roll-ups stay easy to roll and slice.
What Cheese Works Best for Tortilla Roll-Ups?
Cheddar is a classic choice because it has a strong flavor and pairs well with ham. However, mozzarella, Swiss cheese, provolone, Gouda, or Monterey Jack can also work well.
Can I Make These Roll-Ups Without Mayonnaise?
Yes, you can omit the mayonnaise or replace it with Greek yogurt. The spread may be slightly tangier and lighter, but it will still be creamy and easy to use.
How Long Do Tortilla Roll-Ups Last in the Refrigerator?
They are best eaten the same day, but they can be stored covered in the refrigerator for up to 24 hours. After that, the vegetables may start to soften the tortilla.
Can I Add More Vegetables?
Yes, you can add cucumber, grated carrot, roasted peppers, spinach, pickles, or avocado. However, avoid adding too many wet ingredients, because they can make the roll-ups soggy.
What Can I Serve with Tortilla Roll-Ups?
They pair well with fresh fruit, vegetable sticks, salad, soup, potato wedges, pickles, or a light yogurt dip. For lunchboxes, serve them with cherry tomatoes, cucumber slices, grapes, or apple wedges.
Conclusion
Ham and cheese tortilla roll-ups are easy, fresh, creamy, and perfect for quick meals or make-ahead snacks. With soft flour tortillas, a flavorful cream cheese spread, cooked ham, cheddar, lettuce, and tomatoes, they offer a simple combination that is always satisfying.
Furthermore, this recipe is practical for lunchboxes, picnics, parties, and busy days because it requires no cooking and can be prepared ahead of time. Chilling the rolls before slicing helps them hold together and creates neat, attractive pinwheels.
The key to the best result is using dry lettuce, firm tomatoes, and a sharp serrated knife. Serve the roll-ups cold, arrange them on a plate, and enjoy a quick homemade snack that is creamy, savory, colorful, and easy to share.
Check also:
Lemon Chicken Ricotta Meatballs
Chicken and meat easy Recipes
Suggestions:
- Baked Eggs with Mushrooms and Comté Cheese
- Warm Chicken Sweet Potato and Feta Bowl
- Pesto Mozzarella Sun Tart: Easy Puff Pastry Appetizer
- Roasted Pears with Honey and Blue Cheese Appetizer
- Savory Corn and Cheddar Pancakes: Easy Brunch Recipe