


Share
Introduction
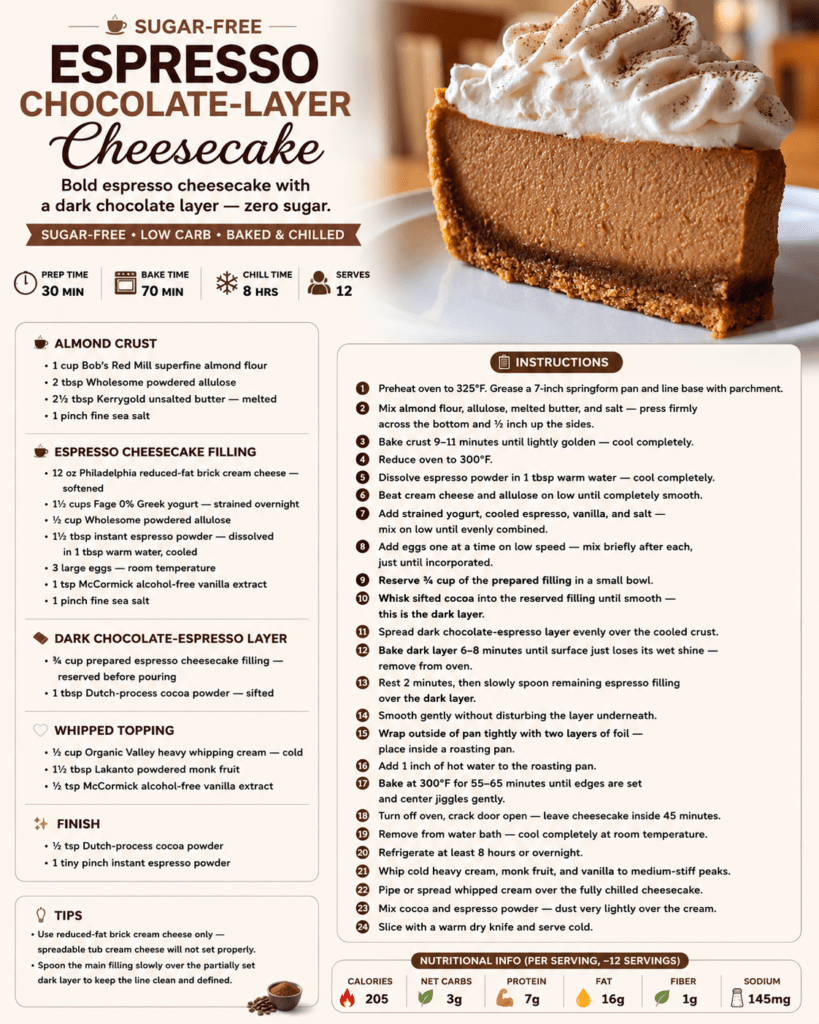
Sugar-free espresso chocolate layer cheesecake is a bold, creamy, and elegant dessert made for coffee and chocolate lovers. It combines a buttery almond flour crust, a smooth espresso cheesecake filling, a dark chocolate-espresso layer, and a lightly sweetened whipped topping. As a result, every slice feels rich, balanced, and satisfying without using regular sugar.
This recipe is ideal when you want a dessert that feels impressive but still fits a low carb or sugar-free lifestyle. The almond flour crust gives the cheesecake a nutty base, while powdered allulose and monk fruit sweetener provide sweetness without traditional sugar. Meanwhile, espresso powder adds depth, and Dutch-process cocoa creates a beautiful dark chocolate layer.
Moreover, this cheesecake is baked slowly and then chilled overnight, which gives it a smooth, firm, and creamy texture. The water bath helps the filling bake gently, while the long chilling time allows the flavors to settle. Therefore, although the recipe requires patience, the final result is worth it.
Another reason this dessert is special is its layered appearance. The dark chocolate-espresso layer sits above the almond crust, while the lighter espresso cheesecake filling creates a clean contrast. Then, the whipped topping and cocoa dusting give the cheesecake a finished bakery-style look.
History and Information About Espresso Cheesecake
Cheesecake has been enjoyed in many forms for generations, and baked cheesecake is especially loved for its dense, creamy texture. Traditional versions often use cream cheese, eggs, sugar, and a cookie crust. However, modern low carb and sugar-free recipes make it possible to enjoy similar textures and flavors using alternative ingredients.
Espresso cheesecake is a more sophisticated version of classic cheesecake. Coffee adds bitterness, aroma, and intensity, which balances the richness of cream cheese. When paired with chocolate, espresso creates an even deeper flavor. This combination is popular because coffee naturally enhances cocoa and makes chocolate taste more complex.
This recipe also uses Greek yogurt in the filling. The yogurt lightens the texture slightly and adds a gentle tang that balances the cream cheese. Since the yogurt is strained overnight, it becomes thicker and helps the cheesecake set properly. This step is important because excess liquid can make the filling too loose.
The almond flour crust replaces a traditional graham cracker crust. This makes the recipe lower in carbs and adds a delicate nutty flavor. Additionally, using reduced-fat brick cream cheese keeps the filling creamy while making the dessert a little lighter than a full-fat version.
Overall, this sugar-free espresso chocolate layer cheesecake is a modern dessert that combines classic cheesecake technique with low carb ingredients and bold coffee-chocolate flavor.
Ingredients
For one 7-inch cheesecake, about 12 servings, you will need:
Almond Crust
- 1 cup Bob’s Red Mill superfine almond flour
- 2 tablespoons Wholesome powdered allulose
- 2 1/2 tablespoons Kerrygold unsalted butter, melted
- 1 pinch fine sea salt
Espresso Cheesecake Filling
- 12 oz Philadelphia reduced-fat brick cream cheese, softened
- 1 1/2 cups Fage 0% Greek yogurt, strained overnight
- 1/2 cup Wholesome powdered allulose
- 1 1/2 tablespoons instant espresso powder, dissolved in 1 tablespoon warm water and cooled
- 3 large eggs, room temperature
- 1 teaspoon McCormick alcohol-free vanilla extract
- 1 pinch fine sea salt
Dark Chocolate-Espresso Layer
- 3/4 cup prepared espresso cheesecake filling, reserved before pouring
- 1 tablespoon Dutch-process cocoa powder, sifted
Whipped Topping
- 1/2 cup Organic Valley heavy whipping cream, cold
- 1 1/2 tablespoons Lakanto powdered monk fruit
- 1/2 teaspoon McCormick alcohol-free vanilla extract
Finish
- 1/2 teaspoon Dutch-process cocoa powder
- 1 tiny pinch instant espresso powder
Preparation Step by Step
Step 1: Prepare the Pan and Preheat the Oven
First, preheat your oven to 325°F. Grease a 7-inch springform pan and line the base with parchment paper. This helps the cheesecake release more easily after chilling.
A springform pan is important because cheesecake is delicate and should not be turned out like a regular cake. The parchment also protects the crust and makes slicing cleaner.
Step 2: Make the Almond Crust
In a bowl, mix the almond flour, powdered allulose, melted butter, and fine sea salt.
Stir until the mixture looks evenly moistened and slightly crumbly. Then, press it firmly across the bottom of the prepared pan and about 1/2 inch up the sides.
Pressing the crust firmly helps it hold together after baking. You can use the bottom of a glass or measuring cup to create an even layer.
Step 3: Bake the Crust
Bake the almond crust for 9 to 11 minutes, or until it becomes lightly golden.
Once baked, remove it from the oven and let it cool completely. This cooling step is important because pouring cheesecake filling onto a hot crust can affect the texture of the layers.
After the crust has baked, reduce the oven temperature to 300°F.
Step 4: Prepare the Espresso
Dissolve the instant espresso powder in 1 tablespoon of warm water.
Stir until smooth, then let it cool completely before adding it to the cheesecake filling. If the espresso is still warm, it may affect the cream cheese mixture and make the filling less smooth.
The espresso gives the cheesecake its bold coffee flavor, so use a good-quality instant espresso powder for the best result.
Step 5: Beat the Cream Cheese and Sweetener
In a large mixing bowl, beat the softened reduced-fat brick cream cheese with the powdered allulose on low speed until completely smooth.
Use low speed rather than high speed because too much air can cause cracks during baking. Scrape down the sides of the bowl as needed so there are no lumps.
Make sure the cream cheese is softened before mixing. Cold cream cheese can create a lumpy filling that is difficult to smooth out later.
Step 6: Add Yogurt, Espresso, Vanilla, and Salt
Add the strained Greek yogurt, cooled espresso, vanilla extract, and fine sea salt to the cream cheese mixture.
Mix on low speed until evenly combined. The strained yogurt adds creaminess and a light tang, while vanilla softens the bitterness of the espresso.
The salt may seem small, but it helps balance the sweetness and makes the chocolate and coffee flavors taste richer.
Step 7: Add the Eggs
Add the eggs one at a time on low speed.
Mix briefly after each egg, just until incorporated. Avoid overmixing once the eggs are added because this can introduce too much air into the batter.
Too much air can make the cheesecake rise too much in the oven and then collapse as it cools. Therefore, gentle mixing is key for a smooth and creamy texture.
Step 8: Reserve Filling for the Dark Layer
Before pouring the main filling into the pan, reserve 3/4 cup of the prepared espresso cheesecake filling in a small bowl.
This reserved portion will become the dark chocolate-espresso layer. Reserving it before assembling the cheesecake keeps the process organized and helps create a clean layered effect.
Step 9: Make the Dark Chocolate-Espresso Layer
Sift the Dutch-process cocoa powder into the reserved cheesecake filling.
Whisk until smooth and fully combined. Sifting the cocoa powder is important because cocoa can clump easily. A smooth dark layer will look better and taste more even.
This layer adds a deeper chocolate flavor and gives the cheesecake a beautiful contrast when sliced.
Step 10: Spread and Bake the Dark Layer
Spread the dark chocolate-espresso layer evenly over the cooled almond crust.
Bake it at 300°F for 6 to 8 minutes, or until the surface just loses its wet shine. This partial baking step helps set the dark layer slightly so it stays defined when the lighter filling is added.
After baking, remove the pan from the oven and let it rest for 2 minutes.
Step 11: Add the Espresso Cheesecake Filling
Slowly spoon the remaining espresso cheesecake filling over the partially set dark layer.
Add it gently and gradually so the layer underneath is not disturbed. Then, smooth the top carefully with a spatula.
This slow method helps keep the line between the dark layer and the espresso filling clean and visible after slicing.
Step 12: Prepare the Water Bath
Wrap the outside of the springform pan tightly with two layers of foil.
Place the wrapped pan inside a roasting pan. Then, add about 1 inch of hot water to the roasting pan.
The water bath helps the cheesecake bake gently and evenly. It also reduces the risk of cracks and helps create a creamy texture.
Step 13: Bake the Cheesecake
Bake at 300°F for 55 to 65 minutes.
The cheesecake is ready when the edges are set and the center still jiggles gently. Do not wait until the center is fully firm, because cheesecake continues to set as it cools.
Overbaking can make the texture dry or grainy, so it is better to remove it when the center still has a soft wobble.
Step 14: Cool Slowly in the Oven
Turn off the oven and crack the door open.
Leave the cheesecake inside for 45 minutes. This slow cooling step helps prevent sudden temperature changes, which can cause cracks.
After 45 minutes, remove the cheesecake from the water bath and let it cool completely at room temperature.
Step 15: Chill Overnight
Once the cheesecake has cooled completely, refrigerate it for at least 8 hours or overnight.
This chilling time is essential. It allows the filling to firm up, the layers to set, and the espresso-chocolate flavor to become deeper and smoother.
For the cleanest slices, do not rush this step.
Step 16: Make the Whipped Topping
When the cheesecake is fully chilled, whip the cold heavy cream with powdered monk fruit and vanilla extract.
Whip until medium-stiff peaks form. The topping should be thick enough to hold its shape but still smooth and creamy.
Cold cream whips best, so keep it refrigerated until ready to use.
Step 17: Decorate and Serve
Pipe or spread the whipped cream over the chilled cheesecake.
Then, mix the Dutch-process cocoa powder with a tiny pinch of instant espresso powder and dust very lightly over the cream.
Slice the cheesecake with a warm, dry knife for clean pieces. Wipe the knife between slices for the best presentation. Serve cold.
Nutritional Information
The following nutritional information is approximate and based on 12 servings.
Per serving, approximately:
- Calories: 205 kcal
- Net carbohydrates: 3 g
- Protein: 7 g
- Fat: 16 g
- Fiber: 1 g
- Sodium: 145 mg
This cheesecake is designed as a sugar-free and low carb dessert. The almond flour crust keeps the carbohydrate level lower than a traditional cookie crust, while allulose and monk fruit provide sweetness without regular sugar.
The Greek yogurt adds protein and helps lighten the filling, while cream cheese gives the cheesecake its classic creamy structure. Because this is still a rich dessert, it is best served in moderate slices.
FAQ
Can I Make This Cheesecake Without a Water Bath?
Yes, you can bake it without a water bath, but the texture may be less creamy and the top may be more likely to crack. A water bath provides gentle heat and helps the cheesecake bake evenly. For the smoothest result, the water bath is recommended.
Why Do I Need to Strain the Greek Yogurt Overnight?
Straining Greek yogurt removes excess liquid and makes it thicker. This helps the cheesecake filling set properly. If the yogurt is not strained, the filling may be too loose or watery, which can affect the final texture.
Can I Use Regular Cream Cheese Instead of Reduced-Fat Cream Cheese?
Yes, regular brick cream cheese can be used. It will make the cheesecake richer and slightly higher in fat. However, avoid spreadable tub cream cheese because it does not set the same way and may make the cheesecake too soft.
Can I Replace Allulose with Another Sweetener?
You can use another powdered sugar-free sweetener, but the texture and sweetness may vary. Allulose works well because it dissolves smoothly and has a mild flavor. If using a different sweetener, adjust the amount according to its sweetness level.
How Do I Keep the Layers Clean and Defined?
To keep the layers clean, partially bake the dark chocolate-espresso layer until it just loses its wet shine. Then, spoon the main filling slowly over the top instead of pouring it all at once. This prevents the two layers from mixing.
Why Did My Cheesecake Crack?
Cheesecake can crack if it is overmixed, overbaked, cooled too quickly, or baked without enough moisture. To reduce cracking, mix on low speed, use a water bath, remove the cheesecake while the center still jiggles, and cool it slowly in the oven.
How Long Should This Cheesecake Chill?
The cheesecake should chill for at least 8 hours, but overnight is best. The long chilling time helps the filling firm up and improves the flavor. If you slice it too soon, the texture may be too soft.
Can I Freeze Sugar-Free Espresso Cheesecake?
Yes, you can freeze the cheesecake without the whipped topping. Wrap chilled slices tightly and freeze for up to 1 month. Thaw in the refrigerator before serving. Add the whipped topping after thawing for the freshest result.
Conclusion
Sugar-free espresso chocolate layer cheesecake is a rich, elegant, and satisfying dessert with bold coffee flavor, a dark cocoa layer, a buttery almond crust, and a creamy whipped topping. It is perfect for anyone who loves the combination of espresso and chocolate but wants a dessert made without regular sugar.
Moreover, this recipe is carefully layered and slowly baked for the best texture. The almond crust adds nuttiness, the espresso filling brings depth, the chocolate layer adds intensity, and the whipped topping gives a soft finish. Although it needs chilling time, the final result is smooth, beautiful, and worth the wait.
In the end, this cheesecake is a wonderful make-ahead dessert for special occasions, dinner parties, holidays, or low carb baking days. Served cold with a light dusting of cocoa and espresso, every slice feels creamy, bold, and delicious.
Check also:
Lemon Chicken Ricotta Meatballs
Chicken and meat easy Recipes
Suggestions:
- Cranberry Orange Cottage Cheese Mug Cake in Minutes
- Light Strawberry Banana Cottage Cheese Cheesecake Bars
- Ultra Fudgy Cottage Cheese Brownie Batter Dip
- Sugar-Free Raspberry Chia Sorbet with Fresh Mint Topping
- Sugar-Free Espresso Chocolate Layer Cheesecake Recipe