

Share
Introduction
This Sugar-Free Salted Caramel Ice Cream is creamy, rich, scoopable, and full of deep caramel flavor without regular sugar. It is the kind of frozen dessert that feels indulgent from the very first spoonful, yet it is made with low-carb ingredients and a smart texture-building method. With heavy whipping cream, cream cheese, Greek yogurt, allulose, sugar-free caramel sauce, vanilla, gelatin, and a touch of sea salt, this recipe creates a smooth frozen treat that tastes like a classic salted caramel ice cream.
What makes this recipe especially helpful is that it is designed for better scoopability. Sugar-free frozen desserts can sometimes freeze too hard because they do not contain regular sugar, which naturally softens ice cream. However, this recipe uses allulose, cream cheese, gelatin, whipped cream, and optional vegetable glycerin to improve the final texture. As a result, the ice cream becomes creamy and easier to scoop after freezing.
Moreover, the caramel sauce is used in two ways. First, it is mixed directly into the base to create a warm golden color and a deep caramel flavor. Then, more caramel sauce is drizzled over the finished scoops with coarse sea salt flakes for a beautiful sweet-salty finish.
This dessert is perfect for anyone looking for a sugar-free ice cream recipe, a low-carb salted caramel dessert, or a homemade frozen treat that does not require regular sugar. It is elegant enough for guests, simple enough for everyday cravings, and delicious enough to keep in the freezer all week.
History and Information About Salted Caramel Ice Cream
Salted caramel has become one of the most popular dessert flavors because it balances sweetness, richness, and saltiness in a very satisfying way. Traditional caramel is made by heating sugar until it melts and develops a deep amber flavor. Then, cream, butter, and salt are often added to create a smooth sauce. In salted caramel desserts, the salt does not simply make the caramel salty. Instead, it enhances the sweetness and makes the flavor more complex.
Salted caramel became especially popular in modern pastry and ice cream shops because it feels both classic and refined. It pairs beautifully with chocolate, vanilla, nuts, coffee, cheesecake, and frozen desserts. Ice cream is one of the best ways to enjoy it because the cold creamy base softens the richness of the caramel while the salt adds a bright finish.
This sugar-free version keeps the same flavor inspiration but uses sugar-free caramel sauce and allulose instead of regular sugar. Because sugar-free ice cream behaves differently in the freezer, this recipe also includes ingredients that help with texture. Cream cheese adds body, Greek yogurt brings a slight tang, gelatin stabilizes the base, and whipped cream adds airiness.
Additionally, vegetable glycerin is included as an optional ingredient because it can help keep sugar-free ice cream softer and more scoopable. Although it is not required, it is recommended if you want a smoother texture straight from the freezer.
Therefore, this recipe is not just a sugar-free copy of classic ice cream. It is a carefully balanced frozen dessert that uses the right ingredients to create flavor, creaminess, and structure.

Ingredients
For the ice cream base:
- 1 1/2 cups heavy whipping cream
- 1/4 cup Fage 0% Greek yogurt
- 3 oz Philadelphia cream cheese, softened
- 1/3 cup Wholesome allulose
- 2 tablespoons ChocZero sugar-free caramel sauce
- 2 teaspoons McCormick vanilla extract
- 1/2 teaspoon Knox gelatin, bloomed in 1 tablespoon cold water
- 1/4 teaspoon fine sea salt
- 1 teaspoon vegetable glycerin, optional but recommended for scoopability
For the salted caramel topping:
- 3 tablespoons ChocZero sugar-free caramel sauce
- 1/2 teaspoon coarse sea salt flakes
Preparation Step by Step
Step 1: Bloom the Gelatin
Start by sprinkling 1/2 teaspoon of gelatin over 1 tablespoon of cold water. Let it sit for about 5 minutes. This process is called blooming, and it allows the gelatin to absorb the water evenly before it is melted.
Using cold water is important because warm water can cause the gelatin to clump. Once bloomed, the gelatin should look thick and slightly firm. This small step helps create a smoother ice cream base and improves the final texture.
Step 2: Beat the Cream Cheese and Allulose
Place the softened cream cheese in a mixing bowl. Add the allulose, then beat the mixture until it becomes smooth and fluffy.
The cream cheese must be softened before mixing. If it is too cold, it can leave small lumps in the ice cream base. Beating it well with allulose creates a creamy foundation and helps the sweetener dissolve more evenly.
This step also gives the ice cream body, which is especially useful in sugar-free frozen desserts.
Step 3: Add Yogurt, Vanilla, Salt, and Caramel Sauce
Next, add the Greek yogurt, vanilla extract, fine sea salt, and 2 tablespoons of sugar-free caramel sauce to the cream cheese mixture. Beat until everything is fully combined.
The Greek yogurt adds a light tang that balances the richness of the cream. Meanwhile, vanilla deepens the dessert flavor, and salt enhances the caramel. The caramel sauce mixed into the base gives the ice cream a warm golden tone and a sweet buttery flavor.
At this point, the mixture should look creamy, smooth, and lightly caramel-colored.
Step 4: Melt the Bloomed Gelatin
Microwave the bloomed gelatin for about 10 seconds. Stir until it is fully dissolved, then let it cool slightly.
The gelatin should be liquid, but it should not be hot when added to the cream cheese mixture. If it is too hot, it may affect the texture of the base. If it cools too much, it may start to set before blending in.
Therefore, the best texture comes from adding the gelatin while it is still warm and fluid.
Step 5: Add the Gelatin to the Ice Cream Base
With the mixer on low speed, slowly drizzle the melted gelatin into the cream cheese mixture. Continue mixing until it is fully blended.
Adding gelatin slowly helps it distribute evenly through the base. This creates a more stable texture and helps prevent icy results after freezing. It also gives the ice cream a creamy structure without making it heavy.
Make sure there are no visible streaks or small gelatin pieces before moving to the next step.
Step 6: Stir in the Vegetable Glycerin
If using vegetable glycerin, add 1 teaspoon to the base and mix until fully incorporated.
Vegetable glycerin is optional, but it is very helpful in sugar-free ice cream because it improves scoopability. Since sugar-free desserts can freeze harder than regular ice cream, glycerin helps the texture stay softer.
If you prefer not to use it, the recipe will still work. However, you may need to let the ice cream sit at room temperature for a few minutes before scooping.
Step 7: Whip the Heavy Cream
In a separate bowl, pour in the heavy whipping cream. Whip it until soft-medium peaks form.
The whipped cream should be thick and airy, but not overly stiff. Soft-medium peaks fold more smoothly into the cream cheese mixture and help create a lighter frozen texture.
Be careful not to overwhip. If the cream becomes grainy, the final ice cream may not be as smooth.
Step 8: Fold the Whipped Cream into the Base
Gently fold the whipped cream into the cream cheese mixture in thirds. Add one-third of the whipped cream first and fold slowly with a spatula. Then, repeat with the remaining whipped cream.
Folding in thirds makes the mixture easier to combine without losing too much air. This step is important because the air in the whipped cream helps make the ice cream lighter and creamier.
Do not beat the mixture at this stage. Gentle folding gives the best texture.
Step 9: Transfer to a Freezer-Safe Container
Pour the ice cream mixture into a freezer-safe container. Smooth the top completely flat with a spatula.
A shallow container works well because it helps the ice cream freeze more evenly. Smoothing the top also makes it easier to press plastic wrap directly onto the surface.
At this point, the base should look creamy, pale golden, and light.
Step 10: Cover the Surface to Prevent Ice Crystals
Press plastic wrap directly onto the surface of the ice cream base. This helps block air and reduce ice crystal formation.
This step is especially useful for homemade sugar-free ice cream because it keeps the texture smoother. After pressing the plastic wrap onto the surface, cover the container with a lid if available.
The better the surface is protected, the creamier the frozen texture will be.
Step 11: Freeze Until Firm
Freeze the ice cream for at least 6 hours or overnight, until fully firm.
For the best result, overnight freezing is recommended. This allows the base to set completely and develop a rich frozen texture. If the ice cream is too firm when you remove it from the freezer, let it rest at room temperature for a few minutes before scooping.
The optional glycerin should help make scooping easier, especially straight from the freezer.
Step 12: Serve with Salted Caramel Topping
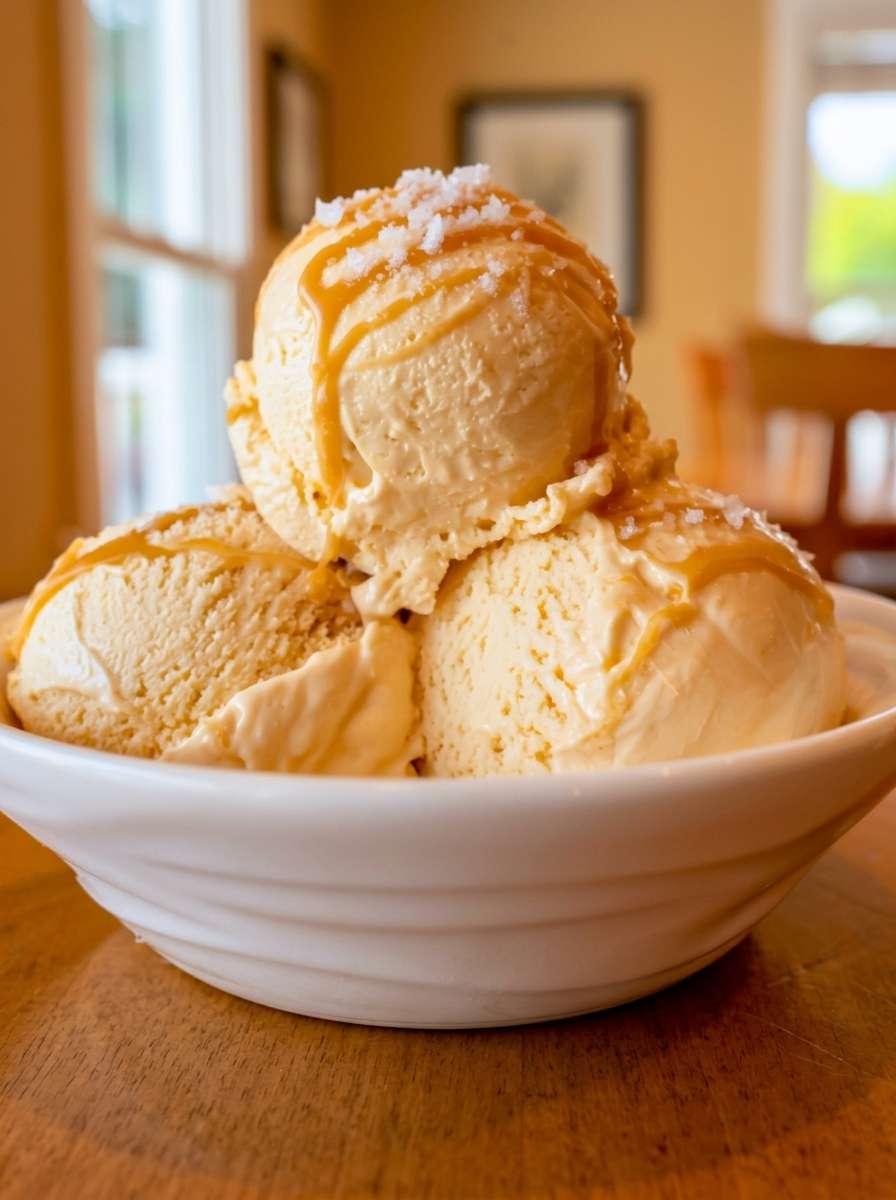
Scoop the ice cream into a white bowl. Drizzle the remaining sugar-free caramel sauce over the top, then finish with coarse sea salt flakes.
The final topping gives the dessert its signature salted caramel flavor. The caramel adds sweetness and shine, while the sea salt flakes create contrast and make every bite more flavorful.
Serve immediately for the best texture.
Helpful Tips for the Best Sugar-Free Ice Cream
For a smoother texture, make sure the cream cheese is fully softened before mixing. This prevents lumps and helps the base become creamy.
Also, do not skip the gelatin step. Gelatin helps stabilize the mixture and improves the texture after freezing. It should be bloomed in cold water, melted briefly, and added while still warm and liquid.
In addition, use allulose rather than a grainy sweetener if possible. Allulose is helpful in frozen desserts because it creates a softer texture than many other sugar-free sweeteners.
Furthermore, vegetable glycerin is optional but recommended. It helps prevent the ice cream from freezing too hard, making it easier to scoop.
Finally, press plastic wrap directly onto the surface before freezing. This simple step helps prevent ice crystals and keeps the ice cream smoother.
Nutritional Information
The following nutritional values are approximate and based on 8 servings:
- Calories: about 210 per serving
- Net Carbs: about 3g
- Protein: about 3g
- Fat: about 19g
- Fiber: about 0g
- Sodium: about 250mg
Nutrition may vary depending on the exact brands of caramel sauce, cream cheese, yogurt, heavy cream, and sweetener used. For the most accurate results, calculate the values using the specific products in your kitchen.
FAQ
Can I Make This Sugar-Free Salted Caramel Ice Cream Without an Ice Cream Maker?
Yes, this recipe is designed as a no-churn style frozen dessert. Since the heavy cream is whipped before freezing, it adds air to the base and helps create a creamy texture without an ice cream machine.
Why Is Vegetable Glycerin Used in This Recipe?
Vegetable glycerin helps keep sugar-free ice cream softer and easier to scoop. Since regular sugar helps traditional ice cream stay soft, sugar-free recipes often need extra support. Glycerin is optional, but it is recommended for better scoopability.
Can I Skip the Gelatin?
You can skip the gelatin, but the texture may be less stable and slightly icier. Gelatin helps create a smoother frozen base and gives the ice cream better body. For the best result, it is worth using.
Why Is My Sugar-Free Ice Cream Too Hard?
Sugar-free ice cream can freeze harder because it does not contain regular sugar. To improve the texture, use allulose, add the optional vegetable glycerin, cover the surface well, and let the ice cream sit at room temperature for a few minutes before scooping.
Can I Use a Different Sugar-Free Caramel Sauce?
Yes, you can use another sugar-free caramel sauce if you prefer. However, the flavor, sweetness, and nutrition may change depending on the brand. Choose a sauce with a smooth texture and a flavor you enjoy.
How Long Should I Freeze the Ice Cream?
Freeze the ice cream for at least 6 hours, or preferably overnight. The longer freezing time helps the base become fully firm and scoopable.
How Long Does This Ice Cream Last in the Freezer?
This ice cream is best enjoyed within 1 to 2 weeks. Keep it tightly covered with plastic wrap pressed against the surface and a lid on the container to reduce ice crystals.
Can I Add Mix-Ins?
Yes, you can add sugar-free chocolate chips, chopped pecans, or small pieces of keto caramel candy. Fold them in after the whipped cream has been incorporated and before freezing. Keep the mix-ins small so the ice cream remains easy to scoop.
Can I Serve This Dessert in Ice Cream Cones?
Yes, you can serve it in sugar-free or keto-friendly cones if desired. However, it is also delicious in a bowl with extra caramel drizzle and sea salt flakes.
Conclusion
This Sugar-Free Salted Caramel Ice Cream is creamy, rich, smooth, and full of sweet-salty flavor. It combines heavy whipping cream, cream cheese, Greek yogurt, allulose, caramel sauce, vanilla, gelatin, and sea salt to create a satisfying frozen dessert without regular sugar.
Moreover, the recipe is designed to solve one of the biggest challenges of sugar-free ice cream: texture. With whipped cream for airiness, gelatin for stability, allulose for softness, and optional vegetable glycerin for scoopability, the final result is smooth and enjoyable.
Serve it in a bowl with extra sugar-free caramel sauce and sea salt flakes for a beautiful finish. Whether you make it for summer, a family dessert, or a low-carb treat, this salted caramel ice cream is a recipe worth keeping in your freezer.
Check also:
Lemon Chicken Ricotta Meatballs
Chicken and meat easy Recipes
Suggestions:
- Creamy Sugar-Free Salted Caramel Ice Cream Dessert
- Soft Sugar-Free Almond Flour Crepes for Easy Brunch
- Easy Sugar-Free Lemon Cream Cheese Dump Cake Recipe
- Sugar-Free No Bake Peanut Butter Pie Recipe
- Creamy Sugar-Free Chocolate Mousse Fluff Dessert Recipe